- Navigation
- Setup
- Preparation (coming soon)
- Introduction
In this illustrated practical case, we are going to show you how Rack Performer can be integrated into your existing MIDI setup, and work alongside other machines to play electronic music live. This study covers a lot of advanced aspects of the application, including external clock synchronization and transport control, with the MIDI clock and standard MIDI transport protocols, MIDI routing (thru), MIDI mapping, manual patch delay compensation, VST instruments, VST effects, VST sequencers, as well as internal modules and much more!
We will be using an old Roland MC303 "Groovebox" as MIDI master, but any machine with an internal sequencer and a MIDI output port should do the trick too (note: if you use for instance an Akai MPC or similar machine, you will have to use the MIDI timecode (MTC) protocol instead of MIDI clock, but this works essentially the same)
We will also control a Nord G2 Modular Engine directly from Rack Performer via MIDI output, but here again any other synthesizer with MIDI input support could be used instead. As we will see in the later parts of this article, getting everything perfectly aligned with this particular setup will prove quite challenging, due to the re-injection loops present in our topology. Solutions are possible, we will explore a few, but it is always a matter of trade-offs.
Let's start with our hardware setup and see how everything is connected.
- Physical Setup

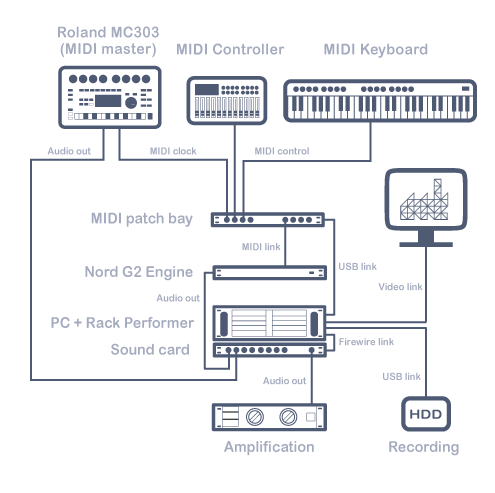
Do not let the diagram impress you, the setup we are using is less sophisticated than it looks. Here is a breakdown of the various components:
- Roland MC303 "Groovebox" as synchro and transport master, with its audio and MIDI outputs connected to the PC via the sound card and MIDI interface
- Nord G2 Modular Engine as slave MIDI expander, receiving clock from the MC303 and MIDI from the PC and sending its audio output to the sound card
- MIDI keyboard and MIDI controller, both connected to the MIDI interface
- M-Audio MIDI Sport 8x8 interface and patchbay, connected to the PC via a USB2 link
- Motu Traveler Mk1 sound card, connected to the PC via a Firewire link
- Rack-mounted PC with Intel quad core Q6600 CPU at 2.4GHz, 4GB of RAM, and running Windows XP SP3
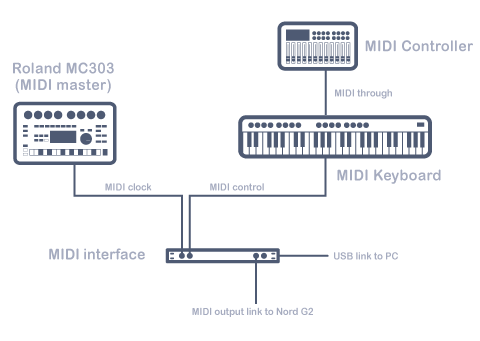
Note that any sound card should work, but performance tend to vary depending on the bus technology used. We recommend by order of preference: PCIe, PCI, Firewire and USB. If you don't have any MIDI patchbay and have for instance only two MIDI inputs and two MIDI outputs, like in the EMU X-MIDI 2x2 that we also use sometimes, and if your MIDI keyboard (or controller) has MIDI thru capacities, the MIDI part of the setup can be simplified as in the following diagram:

- Sound Card Audio Setup
The first thing you should do when starting a new project is to select the proper audio parameters, namely the sampling rate and the buffer size, as their combination determines the sound quality and the latency, as well as having a direct relationship to the CPU usage. When using a sound card with ASIO drivers (recommended) these parameters are configured in the ASIO control panel, which is accessible by clicking on the "configure" button, next to the active wave engine, in Rack Performer configuration menu.
Here are the parameters we used for this session:

It is very important to adjust these settings to adapt to your current project. You might want for instance to use a higher sampling rate when doing high quality audio recordings. You could also need to use the smallest possible buffer size to reduce the latency to the minimum when processing a live instrument, or on the other hand use a larger buffer size when running very large and CPU intensive patches.
Note however than in the rather advanced use case we are describing here, and in general, when external synchronization is involved, it is best to find the right buffer size + sampling rate combo and stick to it. Indeed most of the fine latency compensations that we will need to adjust to align everything perfectly will depend on the selected audio format parameters. Changing either will in most cases force you to recalibrate the system.
- MIDI Setup
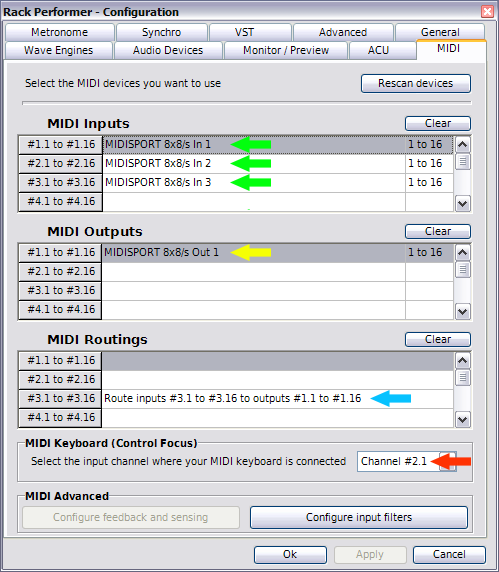
The next step is the MIDI devices and routing setup. In the configuration menu, select the "MIDI" tab:

- In green we have our three input devices. The first is our MIDI controller, the second is our MIDI keyboard and the third will carry clock and transport control signals from the MC303.
- In yellow we have our single output device, to control the Nord G2. This cable will carry many combined commands, as we will see later.
- As we want the Nord G2 slaved to the MC303, we need to forward the clock and transport signals. In order to achieve the smallest possible latency, we need to use the MIDI routing feature, also known as MIDI thru. So we route the third input device to our single output device, as shown in blue.
- Then we will use our single MIDI keyboard to play alternatively different instruments, including the Nord G2. This dynamical keyboard redirection is known as MIDI keyboard control focus. To enable it just select the proper MIDI channel on which your MIDI keyboard is connected (here 2.1, as shown in red)
- Synchro Setup
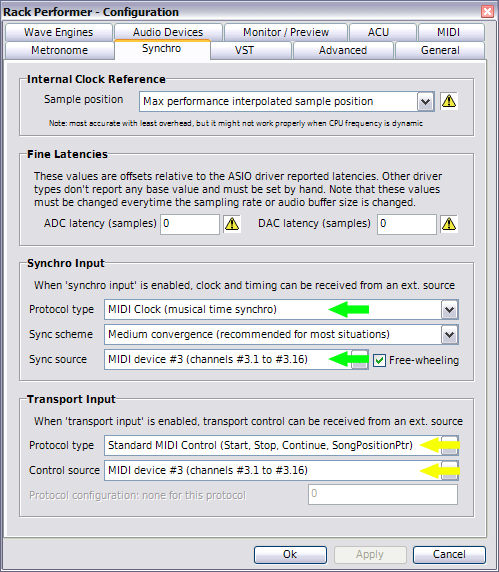
The last step is to tell the application we want to receive external synchronization and external transport control. This is achieved in the "Synchro" configuration tab:

Our MC303 uses the standard MIDI Clock protocol, so we select that as sync input protocol (in green) and make sure to also select MIDI device #3 as sync source. Now our master clock tempo will automatically follow the MC303 tempo. As we will not be using time-stretched samplers in this demo, we can leave the "sync scheme" as is. But you might want to select a slower convergence scheme to reduce wow/flutter or if you plan to have a mostly constant tempo throughout your performance.
Then we want the application in "full-slave mode", to start / stop / reset with the MC303 controls, so we select Standard MIDI control as protocol type (in yellow) as well as the correct MIDI device for control source. When both a sync protocol and a transport protocol are selected, "full-slave mode" is activated and the application will stay locked to the master at all times.
Now that we covered the physical and software setup, we will create our document, assign tracks and prepare our performance.
NEXT - Part 2: Preparation (coming soon)
